Tuesday, May 3, 2011

Teacher Appreciation Gifts

summer days bark on its heels. But before it’s time to toss the backpacks into the closet for the summer, don’t forget to let the teachers know how much you appreciate all that they did the whole year through. Do you need some ideas? Check out these suggestions:

  • Create a mini scrapbook that the teachers can fill with memories from the school year or keep on their desk as a reminder of what THEY did on summer vacation.

  • Help put some fun into grading papers and student recognition by getting your teachers a set of the Recess stamps (#123090 wood/#123092 clear). These stamps and the coordinating wheels (Elementary Alphabet #123229, Teacher’s Pet#111554, For Teacher #123230, and School Colors #123228) are also great for creating cards and tags to go along with the teacher gifts.

  • Give teachers a jump on organization for the new school year with Play Date File Folders (#117170) and Gusseted Envelopes (#120434). Hold it all together with some coordinating ribbon and a handstamped gift tag for a personal touch.

  • Create a handmade gift card holder and embellish it with stamped images, accessories, and a bit of ribbon. Top it off with a gift card to a place they are sure to enjoy all summer long.

Want more ideas? What about a box of handstamped note cards, a coffee mug decorated with Decor Elements, a calendar created in My Digital Studio (#118108), or any of the various chalkboard Decor Elements? You can also check out pages 18 and 19 of the Summer Mini Catalog for other great project ideas for teachers.


Your gifts will be the talk of the playground and you won’t even break a sweat putting together these tokens of appreciation. You’ll be giving the teachers a sweet send-off into summer vacation with your thoughtful and handcrafted gifts.

Wednesday, April 20, 2011

Greenhouse Garden Cherry Cobbler Card


Hello Friends,

This is another card that I received as a swap. It's very simple and very elegant. It was stamped by Sally Davis and she put the recipe on it so I can give you exact ingredients.

Stamps: Greenhouse Garden, Great Friend
Card Stock: Cherry Cobbler, Basic Black, Whisper White
Ink: White Craft, Basic Black
Other: Cherry Cobbler Seam Binding, Curly Label Punch, Decorative Label Punch, Mat Pack, Paper Piercer, Dimensionals

By the way, Cherry Cobbler Seam Binding will be gone forever after April 30. Please let me know if you want to order it and any other items that you need from the Occasions mini catalog.

Have a great day, Pat

Saturday, April 16, 2011

Fun Items Using Merchandise from the Occasions Mini

Hello My Friends,

Once again, it's been too long since I've posted. Maybe today's post will help make it up to you.

I've received several items from my upline, Jill Olsen, that I want to share with you (I did get her permission). Most of these items were made using merchandise from the Occasions Mini Catalog, which is only available through April 30. I don't want you to miss out if there's something that you can't live without.

I'll post these pictures without too much description and you can let me know if you want details. If you do want details, just email me at pat@stampinlady.com and I'll email you details as well as posting them here.

This little basket is made with the Petal Cone die. 


This little chick's basket is made from the same die.

 
I'll just post these other ones and you can let me know if you want details.


Enjoy these adorable cards and baskets.  Just let me know if you have any questions.

Pat


Friday, April 1, 2011

Emboss Resist Card


I received this card as a swap from Linda Madsen.  It uses the emboss resist technique.  We haven't done that for awhile, so let's use this a reminder of how to do it.  There isn't a recipe on the back, so I'll do my best to tell you what the ingredients are and how she made this card.

Stamp Sets:  Elements of Style, Baroque Motifs, and Vintage Vogue

Card stock:  Confetti Cream, Soft Suede, Very Vanilla, and  Regal Rose

Ink:  Versamark, Soft Suede, Regal Rose

Accessories:  Rhinestones, Dimensionals, Clear Embossing Powder, Stampin Sponges
In order to do Emboss Resist, you must first emboss the image using the Versamark pad and the clear embossing powder.  Then sponge on the Soft Suede ink.  The flowers are stamped on to Very Vanilla card stock and cut out.  They're attached to the card with a dimensional.  A rhinestone is placed in the middle.

The center section of the card is stamped with Soft Suede ink and stamped several times without reinking.

It's a very pretty card.  Thank you, Linda.


Friday, March 25, 2011

Studio Sketches Card


I know it's been too long since I posted here and I apologize for that. Maybe I can surprise you and post often for a little while. I think that would be great fun for all of us.

Daughter Kelly is hanging in there. She & Damon have great faith and great attitudes and seem to be coping well. It's been determined that she will need to have surgery, but it hasn't been determined which of the two options she'll need. She'll have either a lumpectomy or a mastectomy toward the end of April. Please continue to pray for all of us as we all have our weak & teary moments.

And now, about the card. Isn't it pretty? It was stamped by Karen Duke—I received it as a swap. There's no recipe, so I'll tell you what I think the supplies are.

Stamp sets: Studio Sketches, A Word for You (A Word for You is a stamp set that I haven't noticed and I really like it. It's shown on page 158 of the catalog.)

Card Stock: Chocolate Chip, Blushing Bride, Pear Pizzazz, and Whisper White. I almost missed the fact that the paper on top of the Pear Pizzazz is designer paper from the In Color paper pack.

Ink: It looks as if it's stamped with Chocolate Chip, both the pitcher and the greeting.

Accessories: Pear Pizzazz marker, Pretty in Pink 1/4” grosgrain ribbon, the Big Shot with the Vintage Wallpaper embossing folder

I imagine you noticed that the embossing folder isn't used on the entire piece of card stock, which leaves room for the greeting at the bottom—very clever!

Have a great day!

Pat

Wednesday, March 9, 2011

Easter Blossoms Card


Isn't this a pretty card? It was a swap that I received that was stamped by Amy Cloncs.

My friend, Doreen, and I were talking about this stamp set, so I thought it would be fun to show this card to all of you.

There's no recipe on the back, so I'll try to tell you how it was made.

The stamp set is Easter Blossoms from the current mini catalog. The card stock appears to be Baja Breeze (it doesn't look that way here, but the real card is Baja Breeze), Very Vanilla, and Not Quite Navy. The designer paper is Springtime Vintage also from the current mini catalog. The ink is Not Quite Navy. The ribbon is Baja Breeze 1/2” Seam Binding also from the current mini catalog. The little rosette looks like the ones on page 16 of the same mini catalog.

By the way, to all of the females out there, in Denver this is Buddy Check 9 day. That means that we need to remind all of our friends to do a breast self-exam today. I've been told that the best way to do it is in the shower. Please don't forget.

I've got several things to put up on this blog, so I'll try to get back to it very soon.

Thanks so much for stopping in. Please let me know if you have any questions.

Happy stamping, Pat


Wednesday, March 2, 2011

Tea for Two

A birthday, a bridal or baby shower, Mother’s Day ... just a few of the reasons to have a tea party. Yep, that’s right. A tea party. It can be a fun and unique way to host an event or just a get together with family and friends. Another great thing about a tea party? It can be enjoyed by grown-ups and young ones alike.
 
Stampin’ Up!’s Springtime Vintage collection offers endless inspiration for a tea party theme. The designer fabric, paper, stamp images, and accessories in this collection share a soft, vintage, pastel look and feel. With all of this at your fingertips, you’ll be able to create a fun, relaxed, and beautiful setting for your tea party.

Need some inspiration? Look no further than the pages of your Occasions Mini Catalog. Here are some ideas to get you started:

  • Invitations & Place Cards
Pair up the Baby Blossom stamp set (#121927 wood/#122000 clear) with the Springtime Vintage Designer Series Paper (#121782) for beautiful and effortlessly coordinated invitations for your tea party. Coordinate place cards with your invites to complete your table setting
 
  • Placemats & Napkins
Use the Springtime Vintage Designer Fabric (#121817) to create placemats, napkins, and napkin rings. Accent these with fabric flowers using the Big Shot Die-cutting machine (#113439) and the Fun Flowers Bigz L Die (#121812). Make your projects that much easier using the Big Shot Fabric Adhesive Roll (#122194). Add Springtime Vintage Big Designer Buttons (#122301) to your projects for a finishing touch.

  • Favors
Create cute and stylish favors with the turn of a crank using the Petal Cone Bigz L Die (#121810) with the Big Shot Die-cutting machine (#113439). Coordinate your favors in the colors used in the Springtime Vintage collection. Embellish with some seam binding, buttons, or glass glitter and you’re sure to bring a glimmer of fun to take home from the party.

And don’t overlook the possibilities with the Vintage Flower Adornments (#121879) and the ribbon Rosettes flowers (#118774) to round out your accessorizing for the tea party. With all of this inspiration, you are sure to create a fun and memorable party for you and your guests - so much so, that you might even be starting a tradition. Contact me today, and I’ll help you get the party under way.

Thursday, February 24, 2011

Carol's Note Pad & Bookmark


Hello My Friends,

First I need to apologize for taking so long to post again. I was preparing for and having stamp camp over the last weekend. It was a great stamp camp and everybody seemed to have a great time. We had a potluck lunch each day so we ate really well, too.

By the way, I asked for recipes for the things that everybody brought for the potluck, so I'll post the ones I've received a little later.

My friend, Carol, brought these two items to show me—actually, she gave me the bookmark; the note pad is for her daughter. Aren't they beautiful. I love my bookmark.

You can probably see that she used Baja Breeze as one of the colors; she put several of the strips through various Big Shot embossing folders. She also used several border punches, and of course, the adorable owl punch.

Have a great day, Pat

Wednesday, February 9, 2011

Ice Cream Cone Card


Hello My Friends,

Isn't this a cute little card. It was given to me by Jill Olsen, my Stampin' Up! upline. It's made using the Petal Cone die (mini p. 15) and the Big Shot. The banner is part of the die. It also uses the Square Lattice embossing folder on the cone itself.

There isn't a recipe on the card, but I believe that the cone is Sahara Sand card stock and the ice cream & banner are decorative paper from the Brights pack of designer paper (Regal Rose). Of course, the cherry is my favorite paper (for the moment), the red glimmer paper that's in the mini.

I should have put something behind the card before I took the picture, but even though it's just on my kitchen table, I think you can see it pretty well.

Enjoy this ice cream card---unfortunately, I think ice cream is wonderful even if it's below zero outside.

Pat

Saturday, February 5, 2011

Valentine Candy Holders


These are the candy holders that I've been telling you that I'd post---I'm finally getting to them.

These are the ones that we made at one of my parties with the cute little saying: All you need in life is a friend who has chocolate..........I'm that friend. We used Ghirardelli chocolates and held them in with a dimensional. When the kids made them, instead of the saying, they put “To” and “From” on the white circle. The kids put Valentine chocolates in them. They're very cute both ways. And of course, we all love the bling from the Red Glimmer paper.

They are cut using the Big Shot and the 2-tag die. I used both 8 ½ x 11 card stock and 12x12 card stock. I first scored the card stock in half and then cut it. For the smaller card stock, I cut them about 2 3/4” wide getting three across. For the 12 x 12 card stock, I cut them 3” wide and got four across. Then I ran them through the Big Shot putting the fold inside the cut line of the larger tag on the 2-tag die.


The decorative paper on the two outside holders is from the Brights Patterns Pack (p. 175 of the current catalog) and the decorative paper on the middle one is from Love Impressions paper (p. 7 in the mini catalog).


We'll do a similar candy holder at stamp camp with an Easter bunny on it.


Aren't they cute?
Pat

Wednesday, February 2, 2011

Madison & Molly's Valentine Boxes


Hello Stamping Friends,

This will be a quick post as it's almost bed time. We were lucky enough to have daughter, Kelly, and two of our granddaughters overnight last weekend. Our goal was to make their school Valentines, and we did accomplish that mission. Then the girls wanted to work on their Valentine boxes.

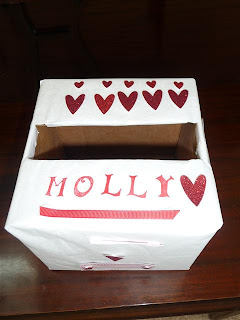
They are, of course, much cuter when you actually see them. Each box is wrapped in several layers of white tissue paper. As you can probably see, Madison's box has red, white, and pink grosgrain bows adhered with mini glue dots around the top. She then used dimensionals to add lots of red glimmer paper hearts that we had punched with the Heart-to-Heart punch. The other thing that Madison did was to use the scraps and cut around the punched out hearts to make very thin heart outlines. We put those on with mini glue dots that we sort of “squeezed” together to make them narrower. The punch has three sizes of hearts that punch at one time.

Molly's box has the same red glimmer paper hearts as well as strips of red, white, and pink grosgrain ribbon. It's so cute!

Madison is 7 and Molly is 5, so you can see what a great job they did.

We all love the red glimmer paper—it really gives us the bling!

I'll try to post the actual candy holders tomorrow. They are darling!


Monday, January 31, 2011

A Fifth Avenue Floral Card


Hello Stamping Friends,

I want to share this card with you that we did at a stamping party a couple of months ago. It's such a beautiful card and so very simple.

The colors are Basic Black and Very Vanilla. You can see that the smallest vanilla strip was put through the Big Shot using the Perfect Polka Dots embossing folder (I love the Big Shot—please let me know if you want to talk “Big Shot” or anything else). The stamp sets are Fifth Avenue Floral and Sincere Salutations. The ribbons are Victoria Crochet Trim (p. 190 of the current catalog) and Basic Black 5/8” Satin ribbon.

Isn't it elegant?

By the way, I'd love to have you send me pictures of the cards that you make—either from the ideas I give you or your own ideas. I might even post some of them if you tell me it's okay.

I'd better get busy and get to cutting card stock for stamp camp. I hope you're planing to attend.

Wednesday, January 26, 2011

Stamp Camp Sneak Peek


Hello My Stamping Friends,

Today I'm sharing a Stamp Camp sneak peek with you. We'll make this card at stamp camp---I love it. This is one of the projects that I took to Leadership as one of my swaps. The colors are so nice and bright and I love the pearls. We'll be using pearls on more than one stamp camp project as they're are among my favorite accessories right now. Another thing I like about this card is that the main stamp set is a small, fairly inexpensive stamp set. I'll give you the ingredients at stamp camp or you can email for them after stamp camp weekend.

I still have a lot of openings for stamp camp on Sunday, February 20 and a few for Saturday, February 19.

I'm going to copy in the Stamp Camp document below as I don't want you to miss out if you're wanting to come, and I do need to receive your check (or paypal payment) by February 1 so I'll know how many people to cut card stock for.

Sale-a-Bration Stamp Camp
and Potluck Lunch
February 19 & 20, 2011

In response to your requests and my missing seeing you, I've scheduled Stamp Camp for Saturday, February 19 & Sunday, February 20, 2001. It will be held at 2222 E. 18th Avenue, Unit C, in Denver, from 10:00 a.m. - 5:00 p.m. We can give you great details of the location.

First, in case you aren't familiar with Sale-a-Bration, please let me tell you about it. It's Stampin' Up!'s best sale of the year. For every $50 that you spend (before shipping & tax), you get to choose a FREE product—stamp set, designer paper, accessories, or décor elements. It is such a great deal!!!

At stamp camp you'll make 15 projects (probably all cards), and there will be a bonus project or two. It will be a great day of stamping fun and you can bring your friends. There will be door prizes and special prices on products.

The stamp camp fee will start at $45; it will be $35 for club members (you still have time to become a club member—I'll be happy to tell you all about it if you like). There are ways that you can reduce those prices.

  • $10 discount on fee by hosting a Sale-a-Bration workshop to be held before March 7, 2011. Party (workshop) total must reach at least $300 in order to receive the discount.

We'll have lots of fun at your party and you will earn lots of FREE Stampin' Up!
products.

  • Reduce your fee to $25 by placing orders totaling $150 in January, February, & March

You may place a $50 order each month or you may place one order of $150 and
receive hostess benefits. (totals are before shipping and tax.) If you're a club
member and place your $50 orders each month through the club (allowing those
months' hostesses to gain hostess benefits from your order), you may choose a
door prize as soon as you walk in the door to stamp camp. You will also be in the
drawings for other door prizes.

  • Sign up to become a demonstrator and you may attend for FREE

  • If you live out of state and want to participate, you may pay the fee as above and I'll make the cards for you. (Depending upon the number of out-of-state participants, it might take me awhile to get them to you.)

Now for some details: there will be 15 projects as well as a couple of bonus projects. You'll need to mail me a check or paypal me to pay your fee by February 1 so that I'll know how much card stock to order and cut. Please let me know as soon as possible that you'd like to attend and which day you want to reserve. I can take only 24 reservations for each day, so don't miss out.


We'll have a potluck lunch each day (of course, you can always pick up something at the store to bring). You'll also need to bring your beverages for the day. The facility has a microwave and a large refrigerator.

Please let me know if you have any questions. You can reach me at 303-674-6435 or you can email or paypal me at pat@stampinlady.com I so hope you can come; I can't wait to see you.

Happy stamping, Pat

Sunday, January 23, 2011

White on White Valentine


I'm getting ready to do a stamping party today—can't wait. I haven't seen these friends in awhile; it will be a fun day.

We were planning to be at a bus rally this weekend and that didn't work out, so I'm going to see other friends today. Jim's been reading me notes from our friends at the rally—we're missing everybody.

I'm about to subscribe to a professional newsletter service, so be on the lookout for some really great newsletters beginning in February. There will be projects in them which I'll be so happy to supply you with. You'll receive about four letters each month—at least that's the way I understand it. I can't wait to get started with it. By the way, please tell your friends about my blog and newsletter. I'd love to have them subscribe, too.

Now for today's card; it's another swap and was created by Blair Moch.

It's white on white, which I think is very rich. Here are the ingredients:

Stamp Set: I (Heart) Hearts, Artistic Etchings (there's a set in the current mini catalog that has a very nice “Amour” as well as other great stamps—it's called Clearly for You. It's the set that was given to us a Leadership and I love it.)

Paper: Whisper White, Pretty in Pink, Cherry Cobbler

Ink: Early Espresso, Pretty in Pink, Cherry Cobbler (can you see the heart that has a design on it? I thought it was patterned paper, but it isn't; the design is part of the stamp.)

Accessories: Heart to Heart punch, Dimensionals, Cherry Cobbler Seam Binding ribbon, Big Shot, Perfect Polka Dots embossing folder

There is a layer of whisper white card stock that has been put through the Big Shot using the Perfect Polka Dots embossing folder, that is layered on  top of the whisper white card base.

Have a great Sunday!

Friday, January 21, 2011

Two More Valentines


Another swap card; this one stamped by Carol Stofer.

I like this card very much; it's very clean and the stamping is sharp.

Supplies:
Stamps: I (Heart) Hearts, Word Play
Card Stock: Basic Black, Very Vanilla
Ink: Red Craft, Basic Black
Accessories: Clear Embossing Powder, Chantilly Crochet Trim, Dimensionals, Paper Snips

I think the only thing you won't be able to definitely see is that fact that the red heart is stamped with Red Craft ink and then embossed with clear embossing powder. The heart is then cut out.


This swap was from Sherrie Robinson.

I haven't yet shown you the swaps that I took, because I'll be using them at my parties this month and at stamp camp. Keep checking back as I'll put them up at some point.

I hope you're enjoying my blog as much as I am. What fun!

Okay, back to this card:

Stamps: None
Ink: Red Craft Spot (just let me know if you want more details)
Card Stock: Very Vanilla, (I think whisper white would be awesome, too), Real Red, Red Glimmer paper (I love this paper and it isn't very expensive—it's in the mini catalog)
Accessories: Big Shot, Scalloped Heart of Hearts embosslits die, Lots of Love Letterpress Plate*, Real Red 1/8” Taffeta ribbon, Dimensionals

*The Letterpress plates allow you to add an inked debossed look to your projects. You ink the plate with craft ink and run it through the Big Shot. It really adds a lot. There's a sample in the mini catalog showing red craft ink is used on the letterpress plate and added to whisper white card stock—very striking.

Thursday, January 20, 2011

Totally Tools Valentine Card


This is another card that I swapped for at Leadership; it was created by Natasha Hein.

She doesn't have her ingredients listed on the back of her card, so I'm going to do my best to figure them out.

Stamp Sets: Totally Tools, Every Little Bit, Sanded
Card Stock: Soft Suede, Cherry Cobbler, Whisper White, Chocolate Chip
Ink: Basic Black or Black StazOn, Cherry Cobbler; markers: Soft Suede, Cherry Cobbler, More Mustard
Accessories: Cutter Kit, Spiral Border Punch, Gold Brads

I believe that the tape measure itself is stamped in black. The markers appear to be scribbled on a plastic surface and then the ink picked up with a blender pen or an aqua painter as the color isn't as intense as it would be if straight marker were used. The Cutter Kit is used to rough up the edges of the Cherry Cobbler and Chocolate Chip card stock.

The largest piece of whisper white cs is stamped lightly with the Sanded stamp, and then the hearts are stamped with Cherry Cobbler over that.

The tape seems to be a photo copy of a tape measure on white paper and then it's colored with the More Mustard marker.

I hope you're having as much fun with my blog as I am.

There are still spots available for stamp camp on February 19 & 20. Please let me know if you have any questions—303-674-6435 or pat@stampinlady.com Stamp camp details are also shown earlier (below) in this blog.

Wednesday, January 19, 2011

A Sweetheart Valentine Card


This is a swap that I received at Leadership; the card was made by Ann Cardile.

Don't you just love it? I do. I decided to make it my first blog project because it uses a stamp set that is on special and the set is only available through January 24.

I'm going to list the supplies and then tell you about the set that's only available for a little longer.

Stamp sets: Filled with Love**, Sweetheart
Card Stock: Whisper White, Pretty in Pink
Inks: Real Red, Wild Wasabi
Accessories: Sizzix Big Shot with Framed Tulip Folder, Full Heart Punch

**Filled with Love Bundle is available only through January 24.  For details, (click here).

The leaves and outline heart are from the Sweetheart stamp set, shown on page 58 of the current catalog. The 3-D heart is from Filled with Love—you'll notice that there are three hearts used, each folded in half and adhered together in order to get the 3-D effect.

When you order the bundle, you receive a package of buttons FREE!

Please let me know if you want me to give you more details (item numbers and prices) or what I can do to make this blog user friendly for you.

By the way don't forget that stamp camp is coming February 19 & 20.  Please contact me for details.

I'm excited to share this with you and I'm also very excited to have my first project on my blog.  Don't forget to subscribe (on the right) so that you'll be notified each time I update my blog.

Pat

Tuesday, January 18, 2011

A Busy Day

Today is going to be a busy day:  grocery store, bank, post office and then the fun begins.

I'm going to start working my stamping business more than I have in the past year. I'd like to do at least 3 parties per month, so if you'd like to have one, please let me know. Now is the perfect time as you earn extra hostess benefits and your guests get FREE products during Sale-a-Bration.

I need to start preparing for the parties that I have coming up this weekend and next. It's exciting as they will be my first SAB parties of the year. I received some Sale-a-Bration swaps while I was at Leadership, and I'm hoping to post some of them here for you to see and use.

I'm new at this blogging thing, so please be patient. I think it will work out that it will be a great way for me to give you stamping ideas between the times that we see each other. I hope it will be a good service for you. I'd love to hear your thoughts and ideas, so please drop me a note and tell me about things you'd like to see here.

I'm sure you're getting tired of hearing about Leadership, so I'll try to make this the last time that I mention it for this year. Every time we go to a Stampin' Up! Event, we do make & takes---that means that SU supplies everything we need to complete several projects. This year they really went over the top for our projects. One of the projects was a Simply Adorned necklace, which included the largest charm, some keys, a crown, and several inserts that we stamped with different designs to match different colored outfits. It's so beautiful and it was so easy. The products can be seen on page 189 of the catalog. I'll try to remember to wear my completed necklace to my parties and stamp camp.

By the way, on the right are two boxes where you can sign up---one to receive my newsletters automatically and the other to be notified when I make a new post to my blog. I'd love for you to sign up for both.

I still have the FREE starter kit that I need to give away. Please see below for the details. If I don't give it away by Friday, it is gone forever. Are you interested? Just let me know 303-674-6435 or pat@stampinlady.com.

The details for stamp camp are also below. I still have openings for both days.

I hope to post projects soon, Pat


Sunday, January 16, 2011

My New Blog

Hello My Dear Stamping Friends,

I'm just adding a quick note here to let you know that I'm planning to write a blog; it will probably take me a few days to get it up and running.

Jim copied in a couple of posts from our regular travel blog about my Nashville trip. What a time that was—it was snowing in Nashville, if you can believe it. But after the Manager's reception dinner (which Jim tells you about), we never went outside. Everything was under one roof. When we walked out of one “building” into the “outdoors”, it felt like Hawaii with very gentle breezes blowing.

I'll send a note out about stamp camp soon. In the meantime, here are the details. Remember that you can just email me pat@stampinlady.com or call me at 303-674-6435 if you have any questions.

Sale-a-Bration Stamp Camp
and Potluck Lunch
February 19 & 20, 2011

In response to your requests and my missing seeing you, I've scheduled Stamp Camp for Saturday, February 19 & Sunday, February 20, 2001. It will be held at 2222 E. 18th Avenue, Unit C, in Denver, from 10:00 a.m. - 5:00 p.m. We can give you great details of the location.

First, in case you aren't familiar with Sale-a-Bration, please let me tell you about it. It's Stampin' Up!'s best sale of the year. For every $50 that you spend (before shipping & tax), you get to choose a FREE product—stamp set, designer paper, accessories, or décor elements. It is such a great deal!!!

At stamp camp you'll make 15 projects (probably all cards), and there will be a bonus project or two. It will be a great day of stamping fun and you can bring your friends. There will be door prizes and special prices on products.

The stamp camp fee will start at $45; it will be $35 for club members (you still have time to become a club member—I'll be happy to tell you all about it if you like). There are ways that you can reduce those prices.

  • $10 discount on fee by hosting a Sale-a-Bration workshop to be held before March 7, 2011. Party (workshop) total must reach at least $300 in order to receive the discount.

We'll have lots of fun at your party and you will earn lots of FREE Stampin' Up!
products.

  • Reduce your fee to $25 by placing orders totaling $150 in January, February, & March

You may place a $50 order each month or you may place one order of $150 and
receive hostess benefits. (totals are before shipping and tax.) If you're a club
member and place your $50 orders each month through the club (allowing those
months' hostesses to gain hostess benefits from your order), you may choose a
door prize as soon as you walk in the door to stamp camp. You will also be in the
drawings for other door prizes.

  • Sign up to become a demonstrator and you may attend for FREE

  • If you live out of state and want to participate, you may pay the fee as above and I'll make the cards for you. (Depending upon the number of out-of-state participants, it might take me awhile to get them to you.)

Now for some details: there will be 15 projects as well as a couple of bonus projects. You'll need to mail me a check or paypal me to pay your fee by February 1 so that I'll know how much card stock to order and cut. Please let me know as soon as possible that you'd like to attend and which day you want to reserve. I can take only 24 reservations for each day, so don't miss out.

We'll have a potluck lunch each day (of course, you can always pick up something at the store to bring). You'll also need to bring your beverages for the day. The facility has a microwave and a large refrigerator.

Please let me know if you have any questions. You can reach me at 303-674-6435 or you can email or paypal me at pat@stampinlady.com I so hope you can come; I can't wait to see you.

Happy stamping, Pat


Thursday, January 13, 2011

Hello from Nashville, TN – Number 2

Hello from Nashville, TN – Number 2

Originally posted by Jim on our travel blog (here)

Thursday morning January 13, 2011 (Second travelogue of this trip).

Hey, this is kind of fun. Pat has been sending me some photos from her phone and I will include a few of them. We have not been able to talk much, but I am gathering from the photos that she is having a wonderful time – as usual.

My wonderful wife of 47 years!

First, she has described the Gaylord hotel as “unbelievable”. It must be spectacular and very luxurious. I asked her if there was any signs of the flood damage from this the terrible floods this spring and she said that she did not see any. 

Pat at the hotel


A view of the hotel

For those of you who do not know much about Pat's association with Stampin' Up!, I need to give you some background. First of all, the Stampin' Up website will tell you a bit about the company (click here). Pat has been a demonstrator for them for over 11 years. She maintains the executive level and has almost 80 other demonstrators in her organization. She has earned eight wonderful cruises/trips. The last one was in 2009 to Hawaii (documented in our blog starting here). She has a website that ultimately links with her page on the SU website (here).

Stampin' Up! is a wonderful company with fantastic products. But, more importantly, they truly appreciate their demonstrators and treat them very well. I often say that it would be difficult to earn a large income with the company, but the experience is unmatched. It is wonderful to attend one of the conventions, or go on one of their cruises, and see how much positive impact that the company has on these demonstrators.

I mentioned the fact in the last blog that Pat was invited (as were some of her downline who have achieved the manager level) to the Manager's dinner  last night. Stampin' Up! always makes this a “big deal”. They do not tell the managers where the dinner will be held until they board the buses. Last night's dinner was at the Wildhorse Saloon (link). I have not talked to her since that dinner, but one of the photos suggests that they had a lot of fun {grin}.

I probably need to clarify “fun”. When we attend the functions, it is interesting to note that there is almost no drinking (indeed, Pat can not drink alcohol because or her Rheumatoid Arthritis medications). We often laugh at the fact that when SU charters a large ship for the cruises, the ship companies must cringe – the bar charges must be almost nonexistent.


The ladies at the Wildhorse Saloon


I mentioned in the last post that the ladies love to swap cards. The photo below shows that activity, but not the frenzied level that I have witnessed {grin}

Swapping cards

I had intended this post to be a simple introduction to some photos that Pat sent me, but I have rambled on – as usual.

Wednesday, January 12, 2011

Hello From Nashville, TN

Hello from Nashville, TN


(Originally posted by Jim on our travel blog:  (here)


Wednesday morning   January 12, 2011   (First travelogue of this trip).


Well, this will be a strange travelogue.  You see, I am writing this from Evergreen, CO, but Pat is in Nashville for a Stampin' Up! Leadership Convention. 


Yesterday, I drove her to the airport so that she could attempt to get to Nashville.  I use the word “attempt” advisedly, as that part of the country is having terrible weather and Nashville was basically shut down Monday and the airport was closed.  It turns out that her flight was only delayed about an hour.


The snow and ice have played havoc with the area.  Several of the demonstrators came in early with the intent of doing some sightseeing on Monday.  With the weather conditions, that did not happen.


Pat is staying at the Gaylord Hotel (link) in the Opryland complex (map).  Actually she spent last night at a different hotel, as the Gaylord was booked up for another convention.  She is getting ready to move today.


Apparently, the hotel adjoins the conference center so the demonstrators will not have to brave the elements.  That said, she will be attending the Manager's Dinner tonight and that is off premises.  I think she said that they will have buses.


I have only experienced these kinds of gatherings a few times.  Obviously, there was a lot of similar activities on the cruises.  I did go with Pat to a Stampin' Up! Convention in Salt Lake city a couple of years ago.  I can not begin to describe to you the energy that is involved with these events.  There are hundreds of demonstrators, all having a huge amount of fun and learning all kinds of neat stuff.


One activity that really defies description is what they call swapping.  The demonstrators make up items with the Stampin' Up! products  and then swap with each other to get new ideas.  Pat typically does 100-200 cards and or decorative items (this year, a neat candy holder).  I witnessed one swapping session that was nothing short of a fish feeding frenzy.  That is not a great picture, but I think you get the idea {grin}.


She is usually very busy and only has a few minutes to talk on the phone.  I will try to pass on some details as I get them.